 .
.
NOTE: We have pre-designed the Guardian Attestation, Home Language Survey, Homeless Enrollment Form, Economically Disadvantaged Form, Title VI ED 506 Indian Student Eligibility Form, Lunch Room Application, Medicaid/SoonerCare Disclosure, OSSAA Eligibility Record Form, Title 1/Part C Family Survey Form and the Parental Consent Form. However, you can edit those forms using Report Designer, if necessary. The E-Form pre-defined templates have some bound fields that auto-fill the appropriate data. The bound fields that will be auto-filled are: Name, DOB, Grade, Guardian Name, etc.
These steps allow you to design an interactive form so that when the Primary Guardian opens the E-Form, they can enter the information directly into each field just as they would write the information on a paper form.
NOTE: Whenever you design an E-Form, you can assign an ID to the editable fields. This allows a Parent/Guardian to edit an E-Form if you send back the submission. The editable fields can also be used to filter the answers entered by the Guardian from the E-Form using the Student Selector. Editable fields include Label Boxes and Check Boxes. Please view the How to Design an E-Form to Collect Answers Using the Student Selector video for detailed instruction.
NOTE: The E-Form has tabbing capabilities to allow the Guardian to move through the fields by using the Tab Key or Shift-Tab Key on their keyboards. By default, the tab order is the order in which the controls are added to the Report Designer. The Check Box control and the Signature control do not accept tabbing so they will be skipped when the Guardian tabs to that type of control. Please view the How to Manage Tabbing video for detailed instruction.
Click the Options Menu, Design Reports to access the Design Reports Form.
Input Specifications are as follows:
Report: Use the Drop Down List Box to select the type of Report you want to design. If you want to design an E-Form from scratch, select Blank Template.
Layout: Type to enter a Layout Name or use the Drop Down List Box to edit a previously created Layout.
Click.
The Report Designer will appear.
The Toolbar displays on the left side of the screen. The Toolbar is where you select what item you want to use to change the Report Body.
The Report Body displays in the middle of the screen and contains the Top Margin Band, Detail Band and Bottom Margin Band.
The Properties Bar displays on the right side of the screen and contains the controls for making changes to the items you use.
You will drag and drop items from the Toolbar onto the Report Body and then use the Properties Bar for further customizing. Essentially working from left to right on the screen.
To adjust the size of any of the Bands within the Report Body, hold your mouse over the bottom or top boundary line until the re-sizing cursor appears, click your mouse, then drag and drop the boundary to the size you want it to be.
To add a Heading to the E-Form:
Click located on the left Toolbar, hold down the mouse and drag the Text Box
to the Top Margin Band.
located on the left Toolbar, hold down the mouse and drag the Text Box
to the Top Margin Band.
Double-click in the Text Box and enter the heading.
To
adjust the size of the text box, use the Re-sizing Box OR you can click
 to
adjust the Size.
to
adjust the Size.
To reposition the location
of the text box, click on the text box, press the Control Key on your
Keyboard and use the Up, Down, Left and Right Arrows on your Keyboard
OR You can click to adjust the location.
To adjust the appearance
of the text (i.e., Color, Font, etc.), click on the text box, click 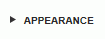 .Then
click
.Then
click  .
Use the Font Tools to edit the appearance of the text.
.
Use the Font Tools to edit the appearance of the text. 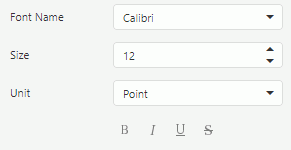
To reposition the location
of the text within the text box, click on the text box, then use the Text
Alignment Drop Down List Box to select where you want the text located.
To add text to the E-Form:
Click located
on the left Toolbar, hold down the mouse and drag the Text Box to the
location you want it to appear in the Detail Band.
Double-click in the Text Box and enter the heading.
To
adjust the size of the text box, use the Re-sizing Box OR you can click
to
adjust the Size.
To reposition the location
of the text box, click on the text box, press the Control Key on your
Keyboard and use the Up, Down, Left and Right Arrows on your Keyboard
OR You can click to adjust the location.
To adjust the appearance
of the text (i.e., Color, Font, etc.), click on the text box, click .Then
click .
Use the Font Tools to edit the appearance of the text.
To reposition the location
of the text within the text box, click on the text box, then use the Text
Alignment Drop Down List Box to select where you want the text located.
To make a Text Box interactive
(i.e., make it where the Primary Guardian can type information), under
 ,
then
,
then  ,
use the Enabled Drop Down List Box to select 'Yes.'
,
use the Enabled Drop Down List Box to select 'Yes.' 
After you have enabled
the Text Box, you can also select the type of data the Primary Guardian
is allowed to enter into the Text Box using the Editor Name Drop Down
List Box. 
Selection specifications are as follows:
Integer: This will only allow Numbers to be entered into the data field.
Integer Positive:This will only allow positive Numbers to be entered into the data field.
Fixed-Point: This will allow Numbers with decimals to be entered into the data field.
Fixed-Point Positive: This will only allow positive Numbers with decimals to be entered into the data field.
Date: This will allow a Date to be entered into the data field. Whenever the Primary Guardian clicks on the data field, a Drop Down Calendar Box will be available to enter the date.
Only Latin Letters: This will only allow Latin Letters to be entered into the data field.
To add a Check Box/Check Boxes to the E-Form:
Click located
on the left Toolbar, hold down the mouse and drag the Check Box to the
location you want it to appear in the Detail Band.
located
on the left Toolbar, hold down the mouse and drag the Check Box to the
location you want it to appear in the Detail Band.
The
Check State defaults to un-checked. To change the Check State, click the
Check State Drop Down List Box and make your selection. 
To
label the Check Box, click on the Check Box, then enter text in the Text
Field. 
To
assign multiple check boxes to a group in order to limit the Primary Guardian
to selecting ONE check box for that group, add the check boxes. Then,
press the control key on your keyboard, click on each check box you want
in the group, then enter a name for the Group ID.  For
example, if you want the Primary Guardian to choose at which School Event
they would be willing to volunteer, you might assign the Group ID as School
Event. Then, if you added 3 check boxes with each one labeled a different
School Event, the Primary Guardian would only be able to select ONE School
Event on the E-Form.
For
example, if you want the Primary Guardian to choose at which School Event
they would be willing to volunteer, you might assign the Group ID as School
Event. Then, if you added 3 check boxes with each one labeled a different
School Event, the Primary Guardian would only be able to select ONE School
Event on the E-Form.
To add a Signature Box to the E-Form:
Click  located on the left Toolbar, hold down
the mouse and drag the Check Box to the location you want it to
appear in the Detail Band.
located on the left Toolbar, hold down
the mouse and drag the Check Box to the location you want it to
appear in the Detail Band.
To adjust the size of
the signature box, use the Re-sizing Box OR you can click to adjust the Size.
To add a black box around
the signature box, click on the signature box, then select the solid box
beside Borders. 
Click  ,
then under, use the Editor Name Drop Down List Box
to select 'Signature.'
,
then under, use the Editor Name Drop Down List Box
to select 'Signature.' 
Once you have designed
the E-Form, you can click  to preview the E-Form.
Click  and
then
and
then  to
save the E-Form.
to
save the E-Form.
To add required fields to the E-Form, please view the How to Add Required Fields to an E-Form video.
To add auto-fill fields to the E-Form, please view the How to Add Auto-Fill Fields to an E-Form video.